If you’ve been here before, it comes as no surprise that OneNote is a favorite app of mine. One thing I haven’t covered before is how to use OneNote on an iPad, which is surprising since this is probably how I most often use OneNote. Let’s dive into it!
OneNote on an Ipad? Best Paired With a Pencil!
First of all, to get the best experience you want to have a pencil or stylus of some kind. Sure, you can use the app just like the desktop version. But being able to use a pen and write brings new things to the experience.
Another thing you wish to do when you start using your pencil or stylus is to adjust the setting for how you usually hold your hand while writing. This is also something to keep in mind if you use an older iPad version: if you’re a lefty then remember that the iPad won’t recognize what is your hand and what is your stylus! This was a huge problem for me when using an older iPad at work. Fortunately, newer iPads don’t have this problem as far as I know.
If you have a pen or stylus, you can use your own handwriting to take notes. Another thing I use quite frequently is combining pictures and notes. For example, insert a pdf printout resize the image, and make notes in the margin or use a highlighter like you would on regular paper.
Another nice thing to do is to combine inserted images or screenshots and make notes next to the picture. This way you get both a picture and some context to remember it by. If you wish to keep the image in place, make sure to set it as the background. This way even if you add notes with the text tool, your image stays right where you want it to be.
This can also be used for demonstration in your classroom, provided you have some way to mirror your iPad on a larger screen in the classroom.
Types of Paper You Can Use on Your iPad
Like on the desktop version, you can change the way your pages look both in terms of color and ruling. The change you make is for the entire page though, so keep that in mind.
Currently, there is no native dot grid paper to choose from. A workaround for this is to download a grid that you like, insert the picture on your page and then set it to act as a background. When doing this, you can make your notes on top of the grid, without it moving around by mistake.
Differences Compared to Desktop Versions of OneNote?
There are some differences compared to the desktop version of OneNote, but it depends on which version you are used to. The iPad version of OneNote looks close to the OneNote version for Windows 10 and if you’re used to navigating in this desktop app, then the iPad version works just the same.
With this version you can create sub-pages, but you can’t really minimize them as much as you can when using the OneNote 2016 desktop version. In the desktop version of OneNote for Windows 10, you can minimize subpages one level deep. This means that even if you break it down even further with sub-pages, still can’t close just level two or three subpages
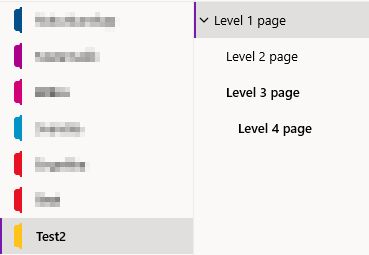
In the iPad version, you can’t minimize the subpages at all, which is a real shame.
Where to Find the Shape Tool in the iPad Version of OneNote?
One tool that is a bit hidden in the iPad version and took me awhile to find, is the shape tool. To find the shape tool you need to go to the far right of your highlighters and press the three dots to open a menu. This is also where you find some settings for pen orientation, draw mode and scribble to shape.
What Else?
Just as you can use hyperlinks, insert images, and so on in your desktop version of OneNote, this can be done on your iPad as well. If you use a keyboard it’s easy to highlight a word that you wish hyperlinked, and have that displayed instead of the URL.
If you give permission, you can make your iPad insert audio recordings for you. This could be useful if you wish to dictate something for yourself. For students, this could be a good way to test themselves on the material they studied or as a way to rehearse things they currently study.
Sharing your notes is also easy to do from within the app. It’s easy to send a copy of your page with Outlook or another app of your choice, straight from within OneNote itself.
Things I Wish Would Work Better in OneNote on the iPad
One thing I wish would improve is the lasso tool. This feels as though it’s missing something compared to other notetaking apps and doesn’t feel intuitive. It works ok but sometimes you may have to redo your selection in order for it to pick up the dots above the i:s and other small parts of your writing, commas is another example.
Another thing I wish would work is the search tool picking up handwritten tools. It works excellent for things you type, but for handwritten text? Nope, not so much.
Summary
Having the OneNote on your iPad can be excellent for taking notes at work or in school. For work, it’s my go-to notebook for all meetings. If needed you can also export your notes and send them to someone else.
It’s easy to annotate pdf:s and make notes on other pictures you insert on your pages.
If you mostly use the text tool, it’s also easy to search for your notes across all your pages and notebooks.
If using Microsoft Office is what you do at work and you use an iPad as well, then using OneNote on your iPad is definitely something you should try. What is your experience of using the iPad version of OneNote?